Route Modeling |
When your disposal company acquires new accounts or loses accounts through the purchase of a competitor, loss of a contract or the work of their sales department, it may be necessary to change the routing of their trucks to maintain a high level of efficiency. Route Modeling provides a separate environment where TRUX will allow the copy of routing data to be manipulated in a closed environment without making any permanent changes to the live routing system until the re-routing is ready for the implementation.
See Route Model Setup prior to proceeding in Route Model Manager.
|
Navigate To: Routing>Route Modeling>Route Model Manager |
Route Modeling Manager is the center place to review all existing models. Existing models will populate the grid. Model actions will be available based on the route model status. Active models will display in black, implemented models in blue, notified models in green and deprecated models in red.

Route Model Actions
- Create New Models to define specific routes to be included in each model.
- Perform actions on existing models such as Edit Model, Delete Model or Undo Model (implemented only).
- Double click on a created or loaded model to open Route Modeling.
- All stops within the routes on the route model must be geocoded before Route Modeling can be opened.
- Geocode stops in Site Map Verification.
Created: Model Created.
Loaded: Routes have been added into a model.
Updated: The calls in the model have been re-sequenced.
Implemented: The model has been implemented into the live environment.
Notified: The notification letter has been sent out.
Deprecated: The current route model has been rendered inactive when the route on the model is also included on a model which has been implemented.
Route Models by route type can be defined to include specified routes. As many route models as needed can be created.
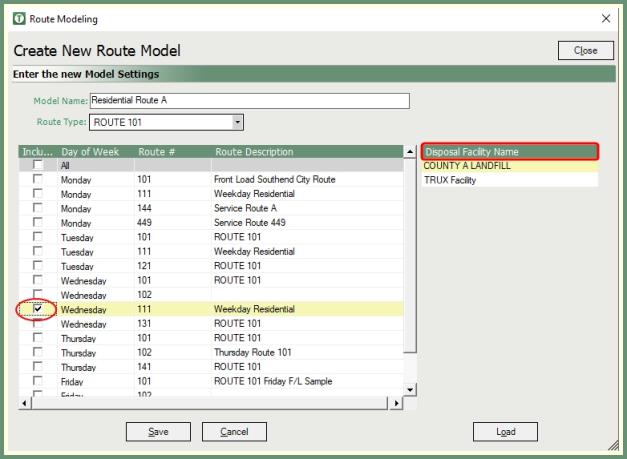
- Enter a well described Model Name.
- Select a Route Type.
- Select the Routes to be Included.
- Multiple routes can be merged into a single route model.
- Click on Day of Week to sort the grid by All or a specified day of the week.
- Enter a specific route number in the top Route # field to filter the grid by route.
- Routed Disposal Facilities on the included routes will be listed in the Disposal Facility Name and will be included in the model.
- Click Save.
- Click Load.
Existing models can be edited by adding or removing included routes.
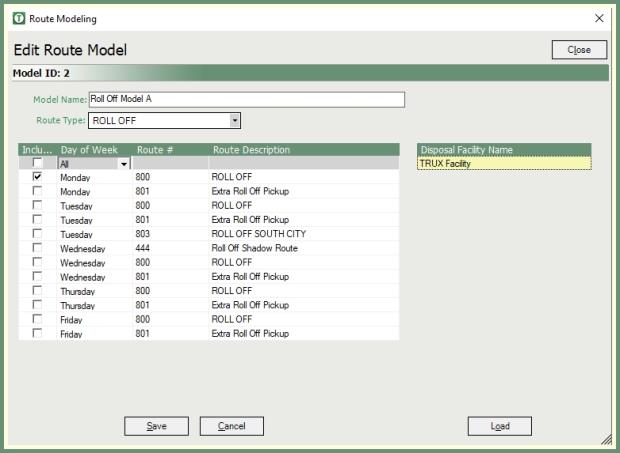
- Select a model from the grid and click Edit.
- Modify Model Name, Route Type and/or included routes.
- Save and Load.
Existing Route Model's that have not been implemented can be removed.
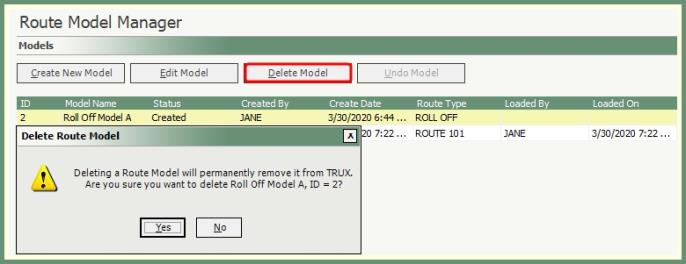
- Select a route model from the grid that has not been implemented.
- Click Delete Model.
- Confirm delete route model message, click yes.
Models that have been implemented can be reversed. The undo model button will only be available when an implemented model is selected.
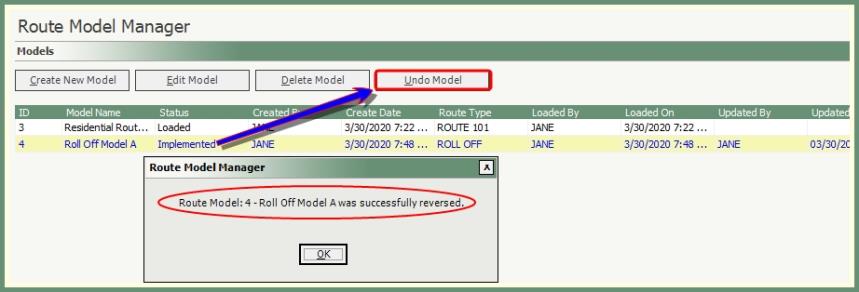
- Select an implemented route model from the grid.
- Click Undo Model.
- Model successfully reversed message will be received.
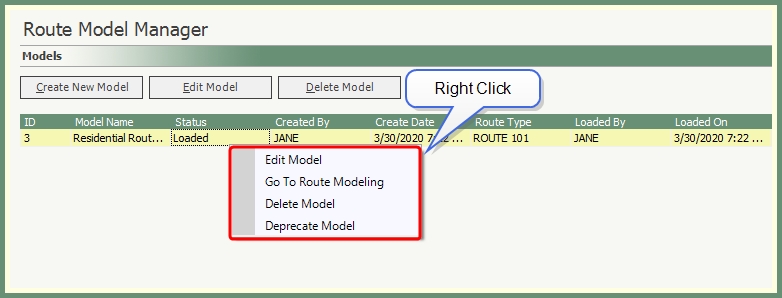
The current route model can be deprecated if the route is in another model and has been implemented.
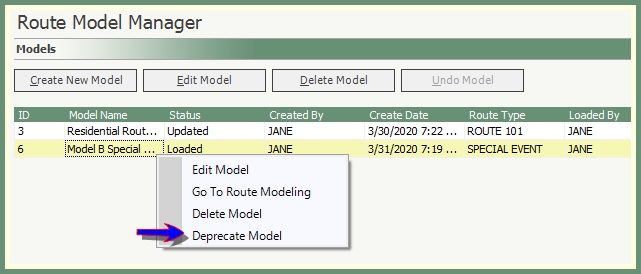
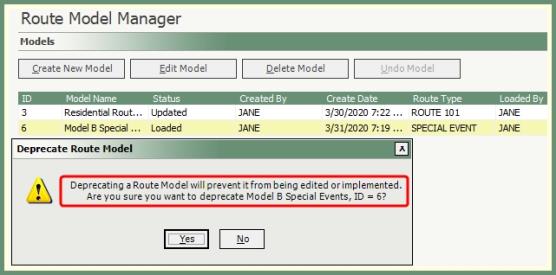
- Right click on a model that has not been implemented.
- Select Deprecate Model.
- Confirm the warning message then click Yes.
- The route model will become inactive and display in red when show inactive models is selected.
Route Modeling is the main program where users can view, filter and resequence loaded route calls, load calls, create route plan, export or import to third-party batches for optimization, review and implement route changes.
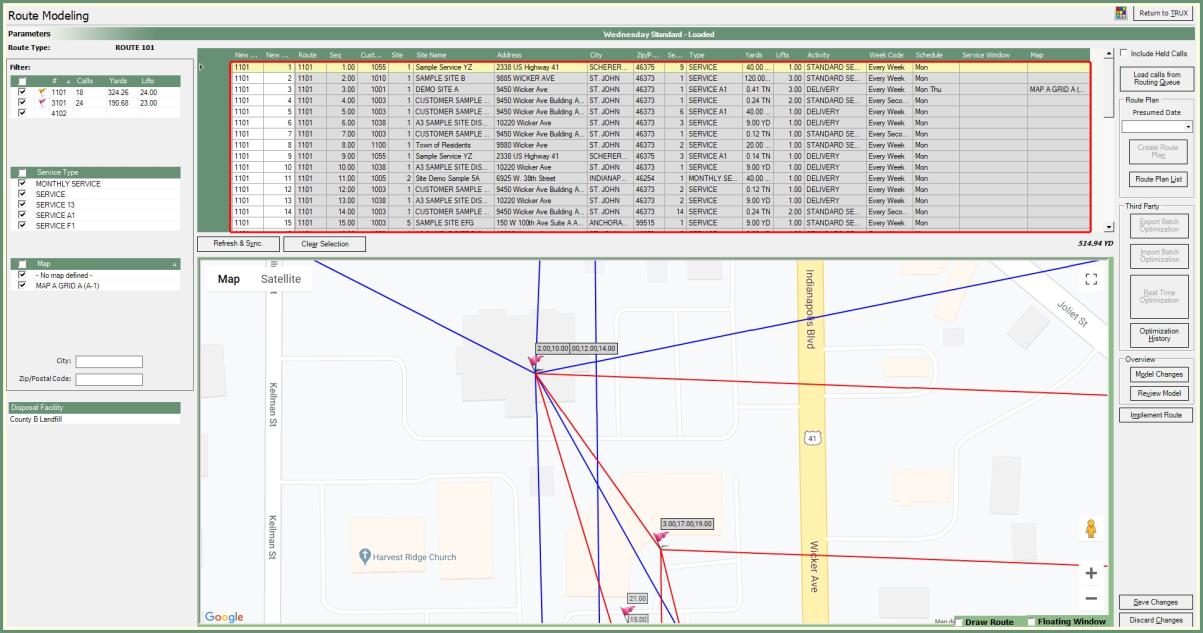
- Calls from all of the loaded routes will populate the grid.
- Call details are populated based on the column header.
- New Route and New Sequence columns can be manually updated.
Note: New Route entries must be for a route in the model. To add another route to the model, see Edit Model.
-
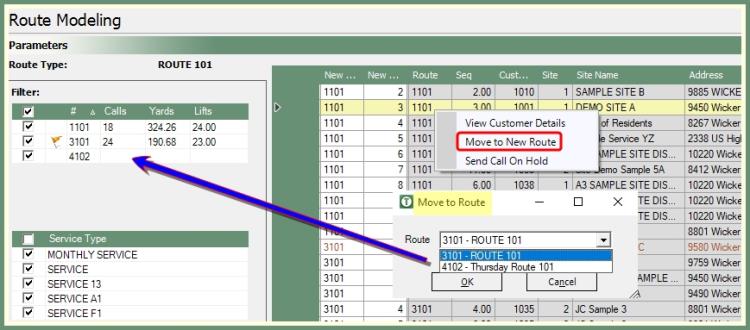
Loaded calls can be sent to a Hold status or Recalled from Hold.

- Select Include Held Calls to include calls on hold in the Loaded grid.
- Right click on a call to Send Call on Hold
- Right click on a held call to Recall from Hold.
- Held calls will display in gray in the grid.
- Calls recalled from hold will display in blue in the grid.

The left pane of the screen are parameter filters available if users need to remove certain service types, maps and/or routes. However, in most cases, the filter selections all remain selected during route modeling.
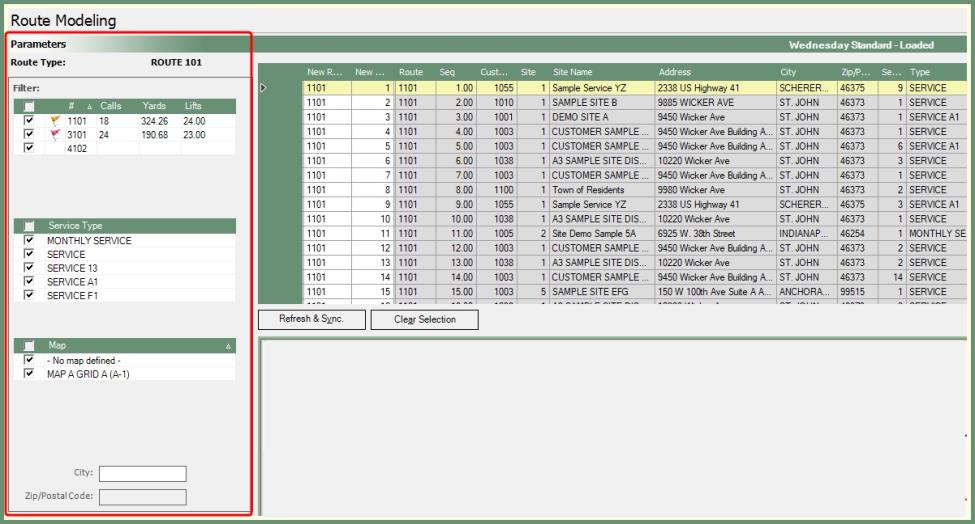
- All loaded routes, service types and maps will be selected by default.
- Count of calls , yards and lifts are included per route number.
- The counts will update as changes are made.
- Remove or edit parameter selections as needed.
- Sort by manually entered City or Zip/Postal Code when map selections are removed.
- Click Refresh & Sync.
Calls in the routing queue can be loaded into the current route model grid.
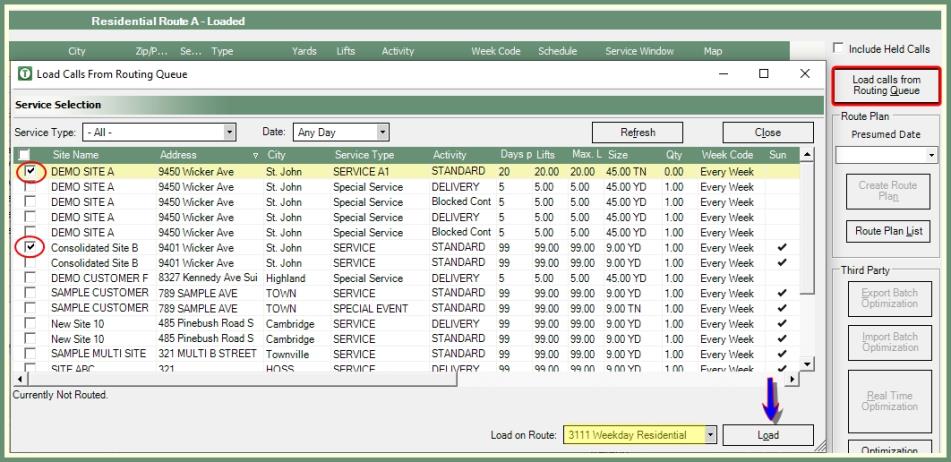
- Click Load Calls from Routing Queue.
- The Service Selection grid will populate with all service types and all days.
- Sort by Service Type and/or Days if needed and click Refresh.
- Select the calls to be loaded.
- The route the calls will be loaded on will be shown at the bottom of the screen. Change if needed.
- Click Load.
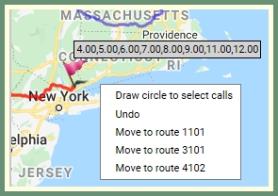
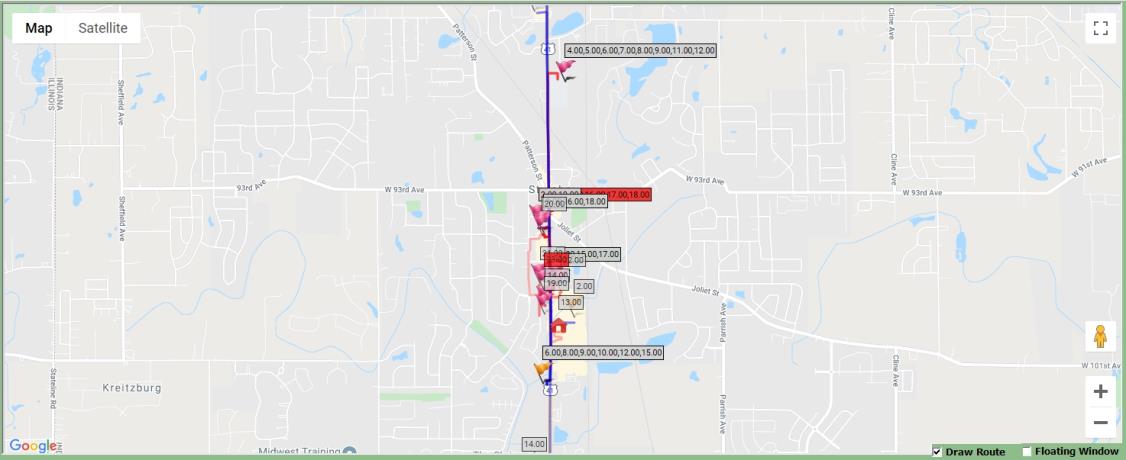
Google map will display the route based on the current sequence in the loaded grid. The map will be synced as the top grid sequence order changes. Route start location, facility and calls will be shown on the map.
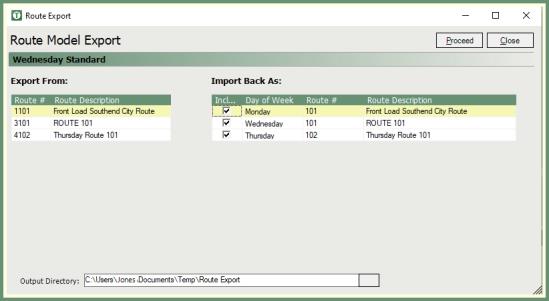
Route Models using a Third Party Process can be exported as a batch file or real time optimization.
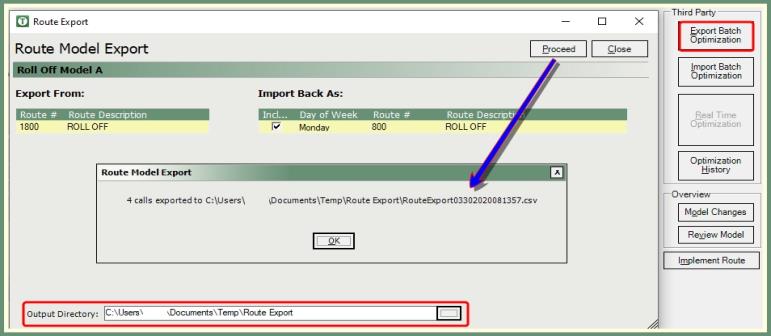
- Click Export Batch Optimization.
- Output Directory will default to the export directory entry from Company Settings>Routing>
- Click Proceed.
- Export call count and location of .csv will be indicated in the Route Model Export message.
- Click Ok.
- Make edits, additions, etc... to the exported batch.
- Save the updated batch to your Import directory.
- Proceed to the steps to Import Batch.
Third Party route model batches can be imported into an existing Route Model.
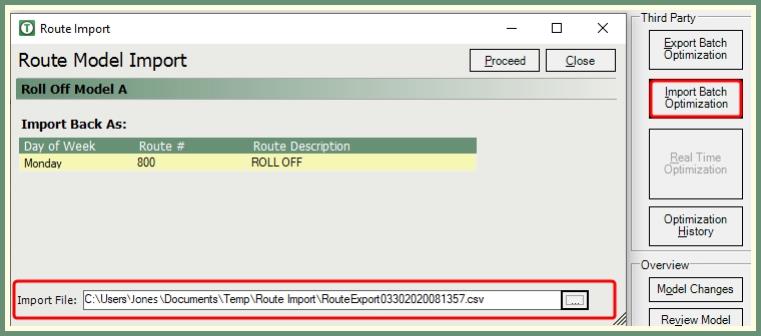
- Click Import Batch Optimization.
- .
- The import file path will default to the import directory entry from Company Settings>Routing>
- Click the more button to navigate to the file to be imported.
The Route Model will pass the below parameters to the 3rd party Real Time Optimization.
1. Stops: (Route#, Route ID, Site address line, city, state, zip code, longitude, latitude, service).
2. Routes: (Route#, Route Start location(address line, city, state, zip code), longitude, latitude, capacity).
3. Facilities: (Facility#, Facility Address (address line, city, state, zip code), longitude, latitude).
The history of routes exported and imported within this model will be presented in the Real Time History grid.

- Click Optimization History.
- The optimization history grid will populate with the project id, routes, status, export user & date, import user & date.
- Sort the grid by any of the column headers.
Calls loaded in the route model include New Route and New Seq columns which can be manually updated.

- Click in the New Route or New Seq field of the call to be updated.
- Enter the New Route or New Seq number to manually update the calls.
- Updated calls will display in blue.
- .
- Click Refresh & Sync to view the updated changes.
- Proceed to Review Model.
- Click Save or Discard Changes.
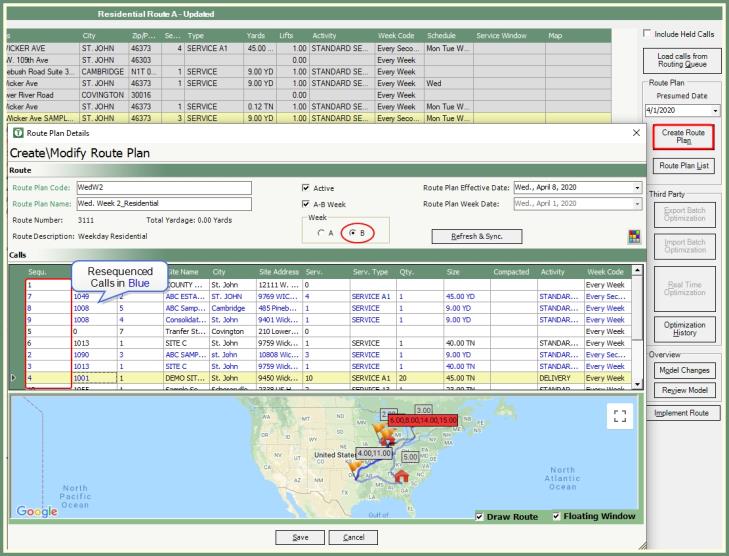
Based on the presumed route date, all of suitable calls will be listed and a route plan will be created to include all of the qualifying calls. Users will have the ability to change the sequence number or move one call up or down within the Create/Modify Route Plan calls grid.
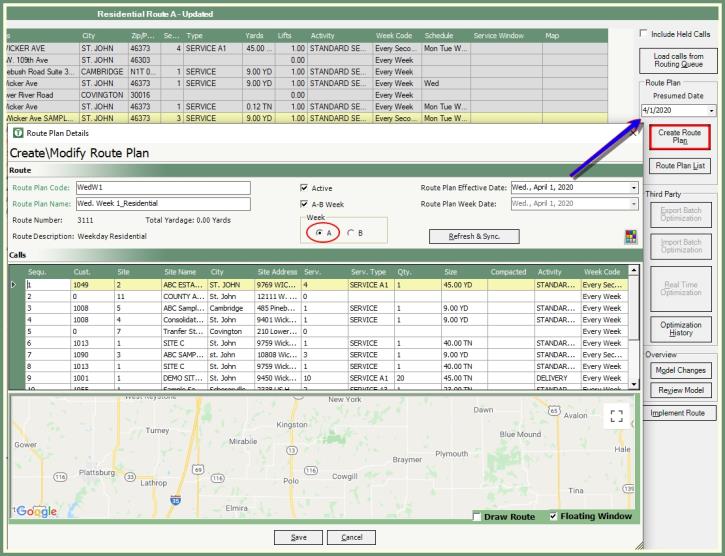
- Select a Presumed Date for this route model.
- Click Create Route Plan.
- Enter a unique Route Plan Code.
- Enter a unique and well described Route Plan Name.
- Optional A-B Week: If the route plan is A-B week route plan, then only allow 2 route plans for this route will be allowed to provide comparison. One is A week route and one which is B week route based on the effective date on the route plan. A & B routes should have two different effective dates. For example, one effective is Dec 7 (Monday), the another one should be Dec 14 (Next Monday), then these 2 route plan will be rotated to move upon their respective route dates.
- Select an Effective Date. Only dates when the scheduled route date is equal or after the effective date of a route plan, will that route plan be applied.
- Resequence calls as needed. Resequenced calls will appear in blue.
- Click Save.
View a list of active and inactive existing route plans for the loaded route model.
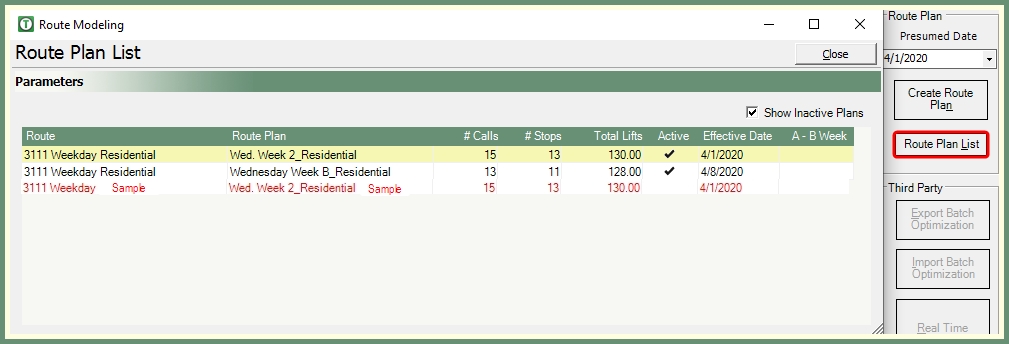
- Click Route Plan List.
- Double click on a plan to open Route Plan Details.
- Show Inactive Plans will display inactive Route Plans in red when selected.
Opens a logged activities report of changes made to the route model.
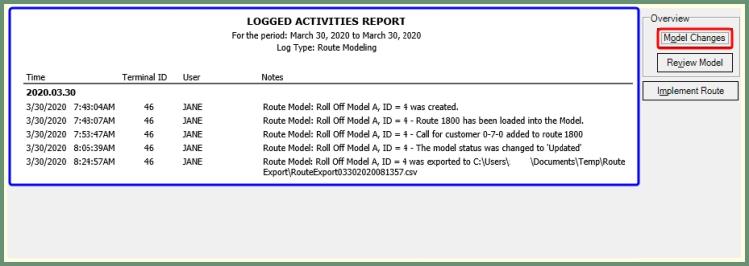
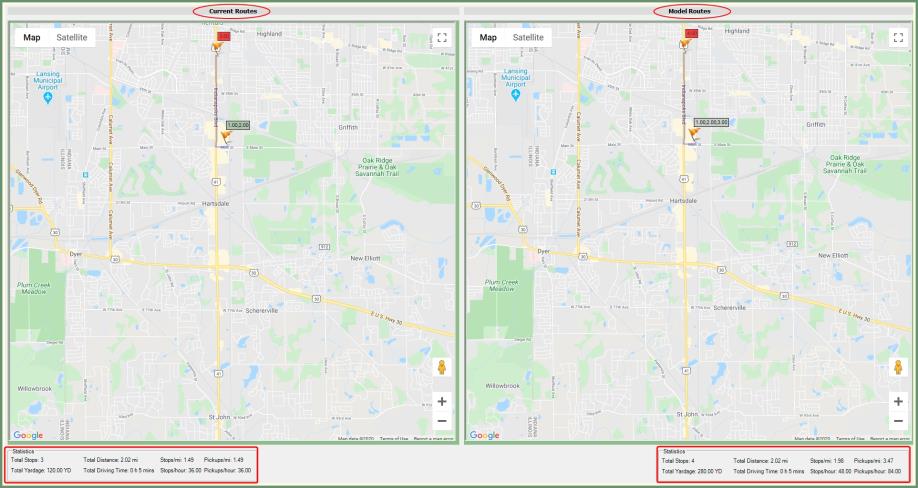
Opens a variety of model review comparisons, changes and notification options.
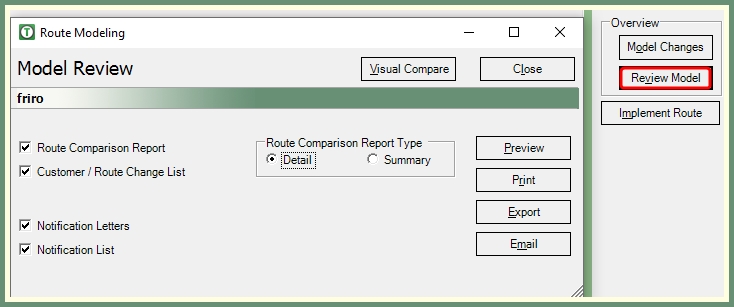
Visual Compare:
Route Comparison Report:
Customer Route/Change List:
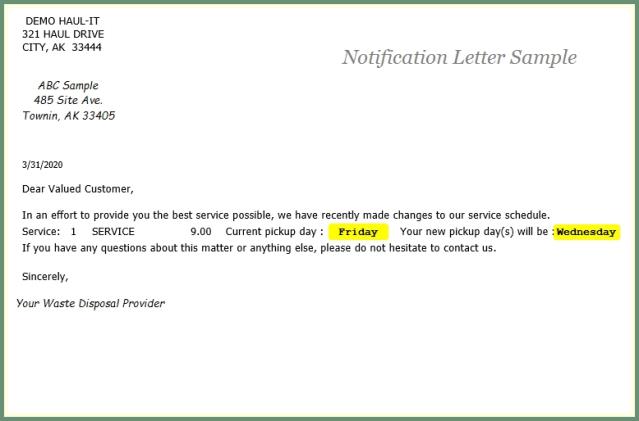
Notification Letters:
- Notification Letters can be customizable. Contact [email protected] for assistance.
- To email notification letters; Route Model Notification Letter must be enabled in Email Notifications.
Notification List: .
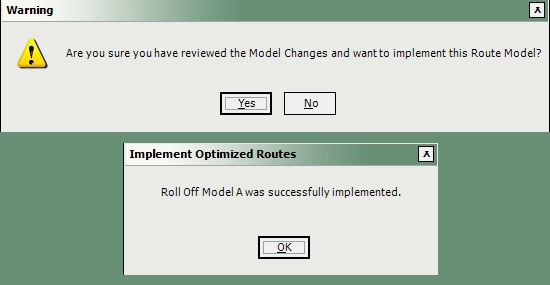
Opens an Implement Optimized Routes window which includes a route statistic by route tab for review and the option to proceed with implementing the current route model plan into the production route model plan. Once the route is implemented, the route plan from the model will become the production route plan and can be used to print the route sheet. The route plan model cannot be used to print route sheet prior to implementation.
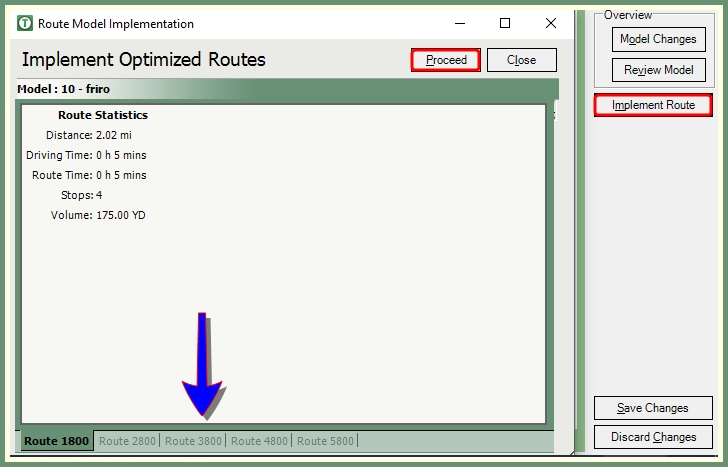
- Review route statistics by route. Click the route tabs at the bottom to change the route view.
- Calls can be added or deleted from a route based on the route model.
- Click Proceed to implement the route.
Navigate To: Routing>Route Center
Route Plans based on the selected route type can be viewed on a route in any status.
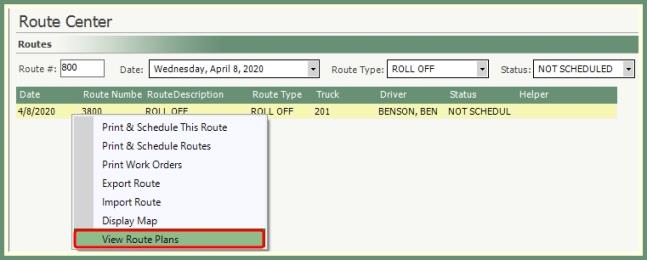
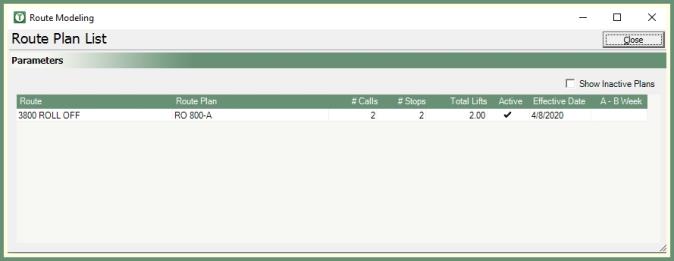
- Right click on a Route.
- Select View Route Plans.
- Double click to select a Route Plan from the list.
Once the route is implemented, the route plan from the model will become the production route plan and can be used to print the route sheet. The route plan model cannot be used to print route sheet prior to implementation.
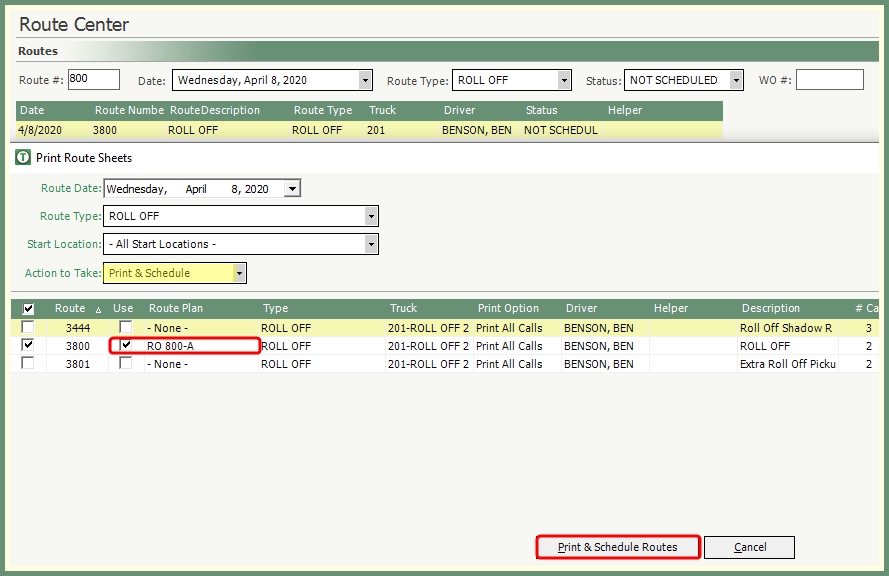
- Select Action to Take, Print or Print & Schedule a route on a Route Plan.
- Select the Use Column. Verify the Route Plan name.
- Print or Print & Schedule Routes.
Create Route Plan from Completed Route
A completed route includes the option to Create Route Plan based on the route sequence for the selected completed route.
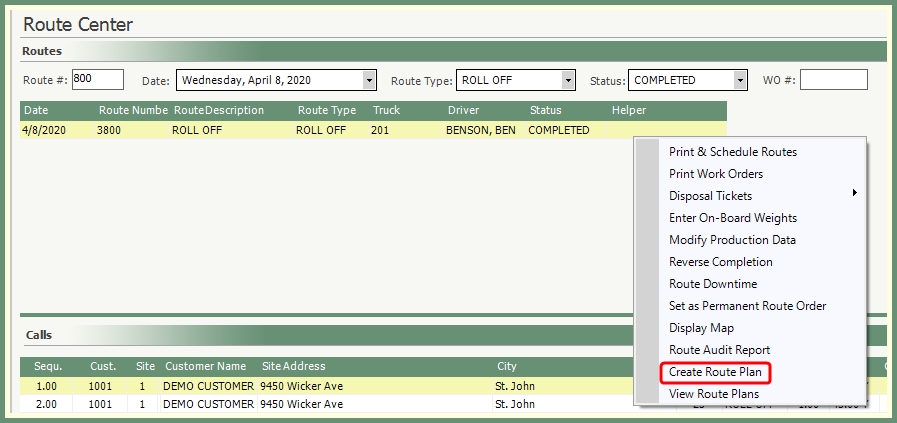
- Right click on a completed route.
- Select Create Route Plan.
- Create/Modify Route Plan will open.
- Only Routed Calls will be loaded.
- Call-Ins and Moved Calls will be ignored.
- Populate according to Create Route Plan field descriptions.
The Route Plan Manager will allow the user to maintain all of the route plans and it will separate between the route plans created from the model and route plans generated from production.
Navigate To: Routing>Route Plan Manager
The route plan in the model will be converted to the production route plan when the model is implemented. Once the route is implemented, the route plan from the model will become the production route plan.
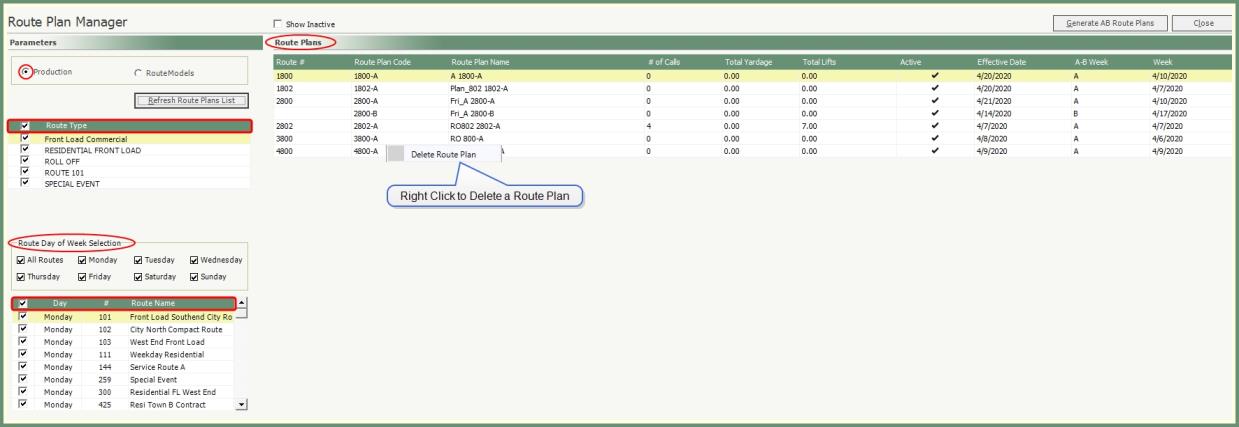
- Select Production parameter.
- Select the Route Type(s) to be included.
- Make Route Day of Week selection; all routes or specific days.
- Select the Route(s) to be included.
- Routes can be sorted by Day, # or Route Name columns.
- Route Plans grid will populate with implemented route plans per parameter selections.
- Double click on a Route Plan to open Create/Modify Route Plan.
- To Delete a route plan, right click on a route plan in the grid.

- Select Route Models parameters.
- Select Route Type(s).
- Route Plans will populate the grid based on the route type selections.
- Show Inactive will include inactive route plan in the grid.
- Double click on a Route Plan to open Create/Modify Route Plan.
- To Delete a route plan, right click on a route plan in the grid.
The Generate A-B Route Plans button is used to create A-B week route plans. This function is not used for regular route plans.
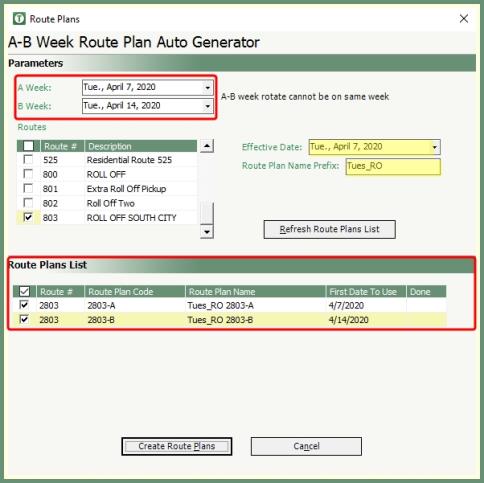
- Click Generate AB Route plans.
- Select A Week Date.
- Verify B Week Date.
- B week will be automatically populate by the same week day in the next week once the A week has been set.
- A-B Week cannot be on the same week.
- Select the Effective Date. This is the date the route plan will start.
- Enter a Route Plan Name Prefix.
- The route plan name will combine the prefix+full route number+A or B indicator.
- Select routes to include in the route plan.
- Click Refresh Route Plans List.
- Select the A-B route selections for this route plan.
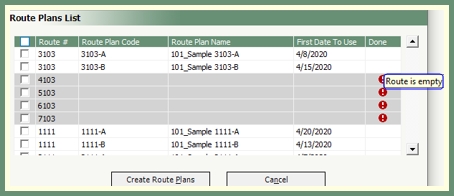
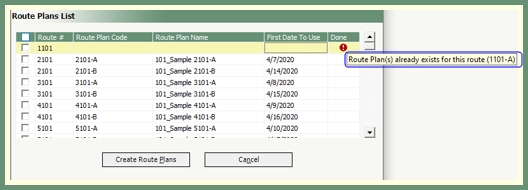
- Routes that cannot be created on the model will be shown in grey with a tooltip.
- Hover over the tooltip to view the reason the route model cannot be selected.
- Click Create Route Plans.
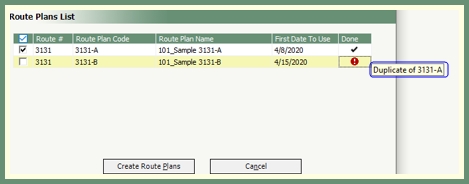
- Route Plan for each route selected will be created and marked in the Done column with a check mark.
- If a route plan fails, an X will populate the Done column and the reason will be shown in the tool tip.
- Double click to recall a route plan to open Create/Modify Route plan to resequence, map, and implement the route plan.
Managing Calls in a Route Model
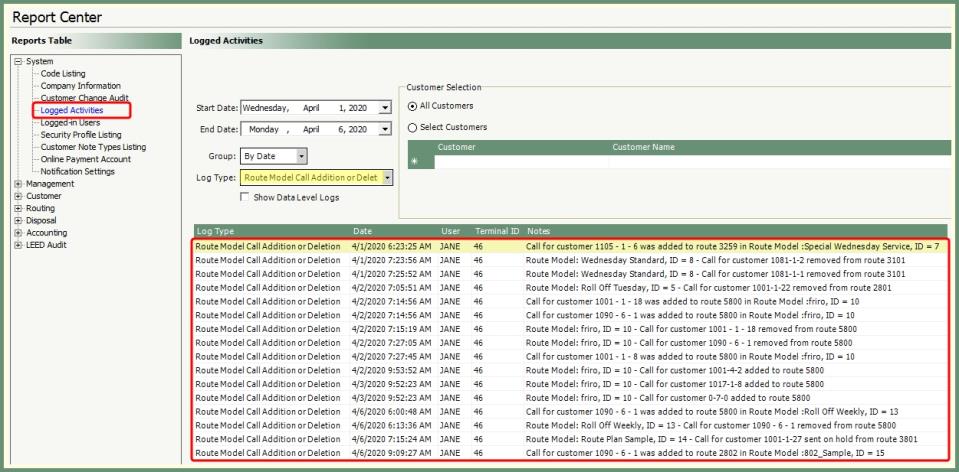
TRUX will automatically manage calls on open route models during route maintenance programs and will log the changes in Logged Activities.
- When calls on an open route model are Move Calls Between Routes, the calls will be added or removed from the route model automatically.
- As calls are added or removed to a route on an open route model in Maintain Routes, the calls will be added or removed from the route model automatically.
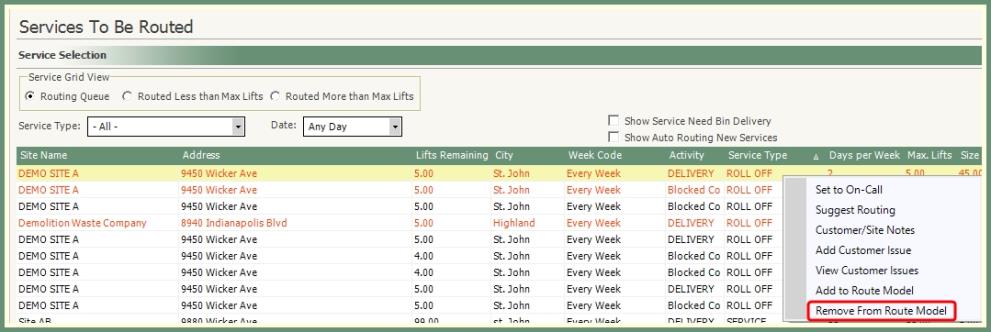
- Unrouted Service calls can be Added to Route Model or Removed From Route Model from the service selection grid in Services To Be Routed.
- Right click on a service in the grid and select
- To remove an already added service from a route model, select
- Select a model from the Route Model List to
- Stopped Service Route Maintenance will remove calls from an open route model when
Permanently Route Customers via Maintain Routes

